A roof leak in San Diego usually comes down to one fix: tarp it safely now, then trace the real source later. You can DIY a temporary tarp or a tiny dab of sealant on a nail pop. Flashing, multiple shingles, or anything on a steep roof needs a pro. Most pro leak repairs here run $350 to $1,200, and a failed DIY attempt is what doubles that bill.
This guide gives you an honest look at how to repair a roof leak. It covers the temporary measures you can take and the complex repairs best left to a pro.
The temporary fixes that actually work in a downpour
When rain is coming down and water is getting in, your goal isn’t a permanent repair. It’s damage control. You need a safe, effective way to stop the water now and buy yourself time to schedule a proper fix.
The most reliable temporary roof leak fix is a heavy-duty tarp. The idea is to cover the suspected leak area and extend the tarp over the roof’s ridge. This creates a watershed that directs rain completely over the damaged section and into your gutters.
Here’s a basic approach for a standard sloped roof:
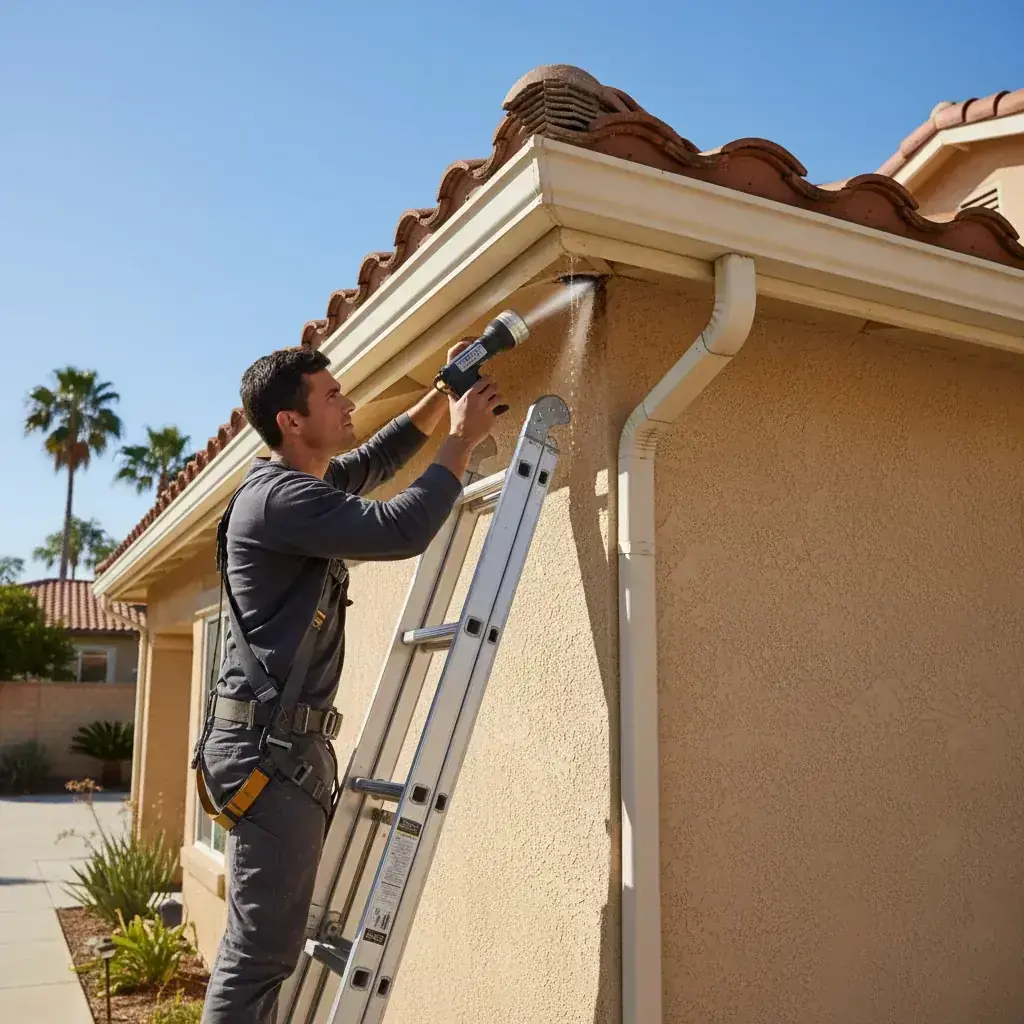
- Safety First: Never get on a wet roof, especially during a storm. Wait for a break in the rain. Wear non-slip shoes and if your roof is steep, don’t even consider it.
- Locate the Source (Roughly): From your attic, try to trace the water stain back up the roof sheathing to find the general entry point. The leak on your roof is almost always higher than the stain on your ceiling.
- Tarp Placement: Unroll the tarp, starting at least four feet below the suspected leak area. Run it all the way up and over the peak of the roof by several feet. This prevents wind from getting underneath and turning it into a sail.
- Secure It: Use 2x4 boards to anchor the tarp. Roll the edges of the tarp around the boards and then screw the boards directly into the roof decking with gasketed roofing screws. Place one board at the bottom edge and one on the other side of the roof peak to hold it down. This is much more secure than using bricks or rocks, which can slide off and cause serious damage.
This is a stopgap measure. A tarp will prevent immediate water damage inside your home, but it’s not a long-term solution and can be dangerous to install. It gives you the breathing room to call a professional for a safe, permanent roof repair service.
Tools and sealants that won’t void your warranty
If you’ve identified a very small, obvious issue, like a nail that has backed out or a tiny crack in the sealant around a vent, and you can access it safely, a small DIY touch-up might be possible. But using the wrong product can void your roof’s material warranty and make a professional repair more difficult and expensive.
Your roof’s manufacturer warranty is a legal document. It often specifies that repairs must be done by an approved installer using compatible materials. Slathering a leak with a tube of “all-purpose” silicone from a big box store can easily void that protection.
Here are some guidelines for a warranty-friendly DIY roof leak repair:
- Check Your Warranty: Before you buy anything, find your roofing warranty paperwork. It will list any restrictions on repairs and may recommend specific sealant brands compatible with your shingles or tiles.
- Choose the Right Sealant: Avoid generic silicone caulk. It doesn’t adhere well to asphalt or oily surfaces and breaks down quickly under San Diego’s UV radiation. Instead, look for a polyurethane-based roofing sealant or a high-quality elastomeric sealant. Products like Geocel 2300 are trusted by professionals because they are designed for roofing materials and remain flexible.
- Minimalist Application: The goal is to seal the specific entry point, not to coat a large area. Use a putty knife to gently lift the shingle or tile, apply a small, neat bead of sealant to the crack or nail head, and press it back down. Less is more. A big, globby mess is a red flag that a DIY repair was done, and it often traps water, making the problem worse.
Remember, this is only for minor, easily accessible issues on a low-slope roof. If you’re unsure, it’s always safer and smarter to pause and get a professional opinion. For more on this, see 2026 flat roof replacement cost in San Diego.
Three repairs you should never DIY (and why)
Some roofing tasks look simple on a YouTube video but are incredibly complex in practice. Attempting them without the right training and tools often leads to bigger leaks, structural damage, or serious personal injury. Here are three jobs you should always leave to a pro.
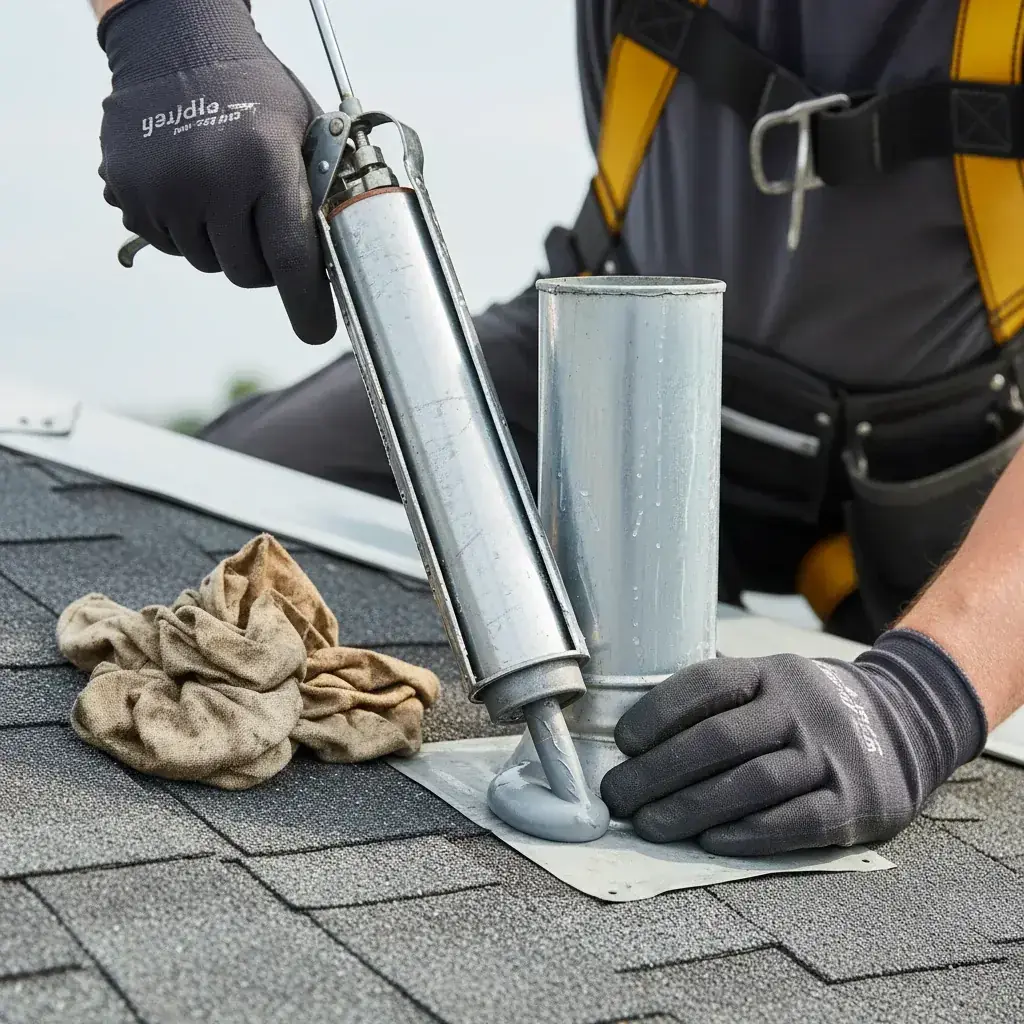
1. Flashing and pipe boot replacement
Flashing is the metal work that seals the transitions on your roof, where the roof meets a wall, a chimney, or a skylight. A leaking pipe boot, the rubber gasket around plumbing vents, is one of the most common leak sources in San Diego. Replacing these components isn’t just about prying off the old one and sticking on a new one. It requires integrating the new piece into the shingle layers in a specific, overlapping sequence. Getting it wrong guarantees water will get trapped under the shingles, causing a worse leak than you started with.
2. Replacing multiple shingles or tiles
Swapping out a single, damaged shingle might seem straightforward. But each shingle is sealed to the ones around it. You have to carefully break those seals without tearing the neighboring shingles. Then you have to nail the new shingle in the correct, hidden spot and reseal everything properly. With heavy clay or concrete tiles, the risk is even greater. They are heavy, brittle, and often part of an interlocking system. Breaking one tile can compromise the entire row, and an improperly seated tile is a direct entry point for rain. For more on this, see 2026 tile roof replacement cost in San Diego.
3. Anything on a steep or multi-story roof
This is a non-negotiable safety rule. According to the National Roofing Contractors Association (NRCA), falls are the leading cause of death in the construction industry. Professionals use specific safety gear, including harnesses, roof anchors, and specialized footwear. Your ladder and a pair of sneakers are not enough. The risk of a life-altering fall far outweighs the potential savings of a DIY repair. If you can’t walk comfortably on your roof, you shouldn’t be on it.
When a ‘small’ leak means structural rot underneath
One of the biggest dangers of a roof leak is underestimating the damage you can’t see. The small, discolored spot on your drywall is just the endpoint of a much longer journey for that water.
Water rarely drips straight down. Once it gets through a shingle or flashing, it hits the roof deck (the plywood or OSB layer). From there, it can travel sideways along a rafter or run down the sheathing until it finds a seam or a nail to drip from. A leak that appears over your living room could have its origin point ten feet away, near a dormer or vent.
By the time you see evidence inside, that water has likely been soaking into your roof structure for weeks or even months. This prolonged moisture has serious consequences:
- Sheathing Rot: The wood sheathing gets soft and spongy, losing its structural integrity. This compromises the entire roof’s ability to hold nails and withstand wind.
- Mold and Mildew: The dark, damp space in your attic is a perfect breeding ground for mold. This can affect your home’s air quality and require expensive remediation to remove.
- Saturated Insulation: Wet insulation becomes compressed and useless. It loses its R-value, leading to higher energy bills, and can hold moisture against your ceiling joists, promoting rot.
- Structural Damage: In severe, long-term cases, the rafters and trusses that form the skeleton of your roof can begin to rot, requiring major structural repairs.
This is why a professional roof inspection is so important. We don’t just patch the symptom; we trace the leak back to its source and assess the condition of the entire surrounding system, decking, underlayment, and framing, to ensure the problem is solved completely.
What it costs to bring in a pro after a failed DIY
We often get calls from homeowners who tried to fix a leak themselves, only to have it return worse than before. We’re not here to judge; we understand the desire to save money. However, it’s important to understand how a failed DIY attempt can increase the final repair cost.
The primary issue is often the use of improper materials. When a large area is covered in silicone, tar, or a “flex” spray product, a professional has to spend significant time and labor just to remove it. These materials don’t bond properly with professional-grade sealants, so the entire surface must be painstakingly scraped and cleaned before a real repair can even begin. This added labor directly translates to a higher bill.
Another common problem is collateral damage. Trying to pry up sealed shingles without the right tools can tear or crack adjacent, perfectly good shingles. This turns a simple “replace one shingle” job into a “replace five shingles” job, increasing material costs. Similarly, walking on a tile roof without knowing the proper paths can crack tiles, turning a small leak into a widespread problem.
A small, professional repair might cost a few hundred dollars. But if we have to spend an extra hour or two removing improper sealant and then replace extra shingles damaged during the attempt, that cost can easily double. An initial call for a professional roof leak repair is almost always more cost-effective than paying a pro to fix both the original leak and the failed attempt.
What a roof leak repair actually costs in San Diego
Numbers help you decide. Here’s what we see across San Diego County for common leak repairs in 2026. These are typical ranges, not quotes. Your roof, access, and pitch all move the price.
- Single shingle or tile replacement: $200 to $450. The fix is small. The trip charge and labor minimum set the floor.
- Pipe boot or vent collar replacement: $300 to $600. One of the most common leaks in the county, and a quick fix when caught early.
- Flashing repair around a wall, chimney, or skylight: $400 to $900. More if the flashing was buried under stucco or tile.
- Tile leak repair with underlayment patch: $500 to $1,200. The tile is fine. The felt underneath it failed, and that’s the real job.
- Emergency tarp and same-day stop-leak: $300 to $700. Buys you a dry week to schedule the permanent fix.
A few local factors push these higher. Coastal homes in Encinitas, Cardiff, and La Jolla often have corroded fasteners and flashing from salt air, which adds labor. Older Spanish-tile roofs in North Park, Kensington, and Point Loma need careful walking and tile-matching, which takes time. For a full breakdown by repair type, see our roof leak repair cost guide for San Diego.
How a pro actually finds the leak
The hardest part of a leak repair isn’t the patch. It’s finding where the water gets in. Water travels, so the stain on your ceiling is rarely under the hole in your roof. A guess-and-caulk approach is why so many leaks come back.
Here’s how a real leak hunt works:
- Interior trace: We start in the attic with a flashlight, following the water trail up the sheathing to the highest wet point. Daylight through the deck is a dead giveaway.
- Visual roof inspection: On the roof, we check the usual suspects first. Cracked pipe boots, lifted flashing, slipped tiles, and failed sealant around penetrations cause most San Diego leaks.
- Water test: When the source isn’t obvious, we run a garden hose over sections of the roof in order, low to high, while someone watches inside. This isolates the entry point instead of soaking the whole roof and guessing.
- Moisture meter: A meter reads moisture in the deck and drywall, so we can map how far the water spread and catch hidden rot before it costs you a structural repair.
This is the step DIY almost always skips, and it’s why a tube of sealant on the wrong spot doesn’t hold. If you want to try tracing it yourself first, our guide on how to find a roof leak in San Diego walks through the attic method step by step.
Coastal vs inland: why your zip code changes the repair
San Diego isn’t one climate. A leak in Oceanside has a different cause than the same-looking leak in El Cajon, and the fix isn’t always the same.
Near the coast, salt air is the slow killer. In Encinitas, Carlsbad, Pacific Beach, and Coronado, salt corrodes the nails, staples, and metal flashing that hold your roof’s water seal together. Fasteners back out, flashing rusts thin, and the leak follows. A coastal repair often means replacing corroded metal, not just resealing it. Resealing rusted flashing is a patch that fails by next winter.
Inland, in Santee, El Cajon, Escondido, and Ramona, heat and UV do the damage. Asphalt shingles dry out and crack, sealant gets brittle, and tile underlayment bakes until it splits. These leaks tend to show up during the first heavy rain after a long dry summer, when brittle materials finally give. If your roof only drips in heavy rain, that pattern points to worn underlayment or flashing rather than a single hole.
This is also why generic big-box sealant fails fast here. It can’t handle either the salt load near the water or the UV punishment inland. Matching the repair to your microclimate is the difference between a fix that lasts years and one that lasts a season.
Do you need a permit to fix a roof leak in San Diego?
For a true repair, usually not. The City of San Diego and most county jurisdictions don’t require a permit for minor leak repairs or patching a small section. You can replace a pipe boot, fix flashing, or swap a handful of shingles or tiles without pulling paperwork.
The line gets crossed when a repair turns into a re-roof. If you replace or recover a large area, most local building departments require a permit, and California’s Title 24 energy rules can apply once you’re replacing enough of the roof. Cool-roof requirements and added inspection steps kick in at that threshold. A real leak repair stays well under it, but a roof that needs leaks fixed every winter is usually telling you it’s near the end of its life. Rules and thresholds vary by city, so confirm with your local building department before any large job.
When to call us
A temporary tarp or a tiny dab of the right sealant on a nail pop are reasonable DIY tasks if you can do them safely. For everything else, you need a professional. If your leak involves flashing, more than one shingle, or requires getting on a steep roof, the risks to your home and your safety are too high.
We find the true source of the leak and check for hidden damage, ensuring the fix is permanent. Before you climb that ladder, give us a call.
Call us at (760) 750-5557 for a same-day estimate.